Home → Windows 10 → Operating System → How to Turn On or Off Connect Automatically to Wireless Network in Windows 10
2.2. How to Turn On or Off Connect Automatically to Wireless Network in Windows 10
When you connect to a new wireless network, Windows will create a profile for the wireless network. A wireless (Wi-Fi) network profile contains the SSID (network name), password key, and security information to be able to connect to a wireless network.
This tutorial will show you different ways on how to turn on or off to connect automatically to a wireless network when in range in Windows 10.
Option 1
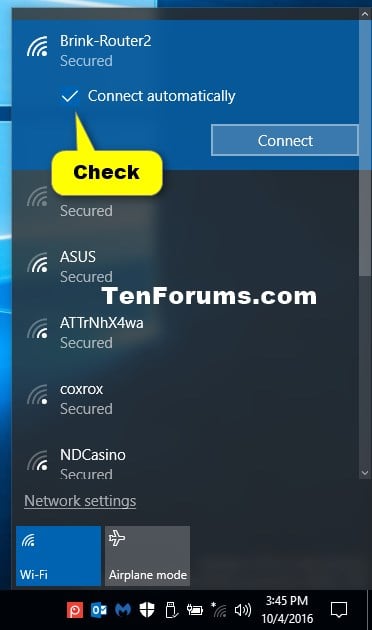
To Turn On Connect Automatically to Wireless Network when Connecting To
1. While connecting to a wireless network, check the Connect automatically box. (see screenshot below)
Option 2
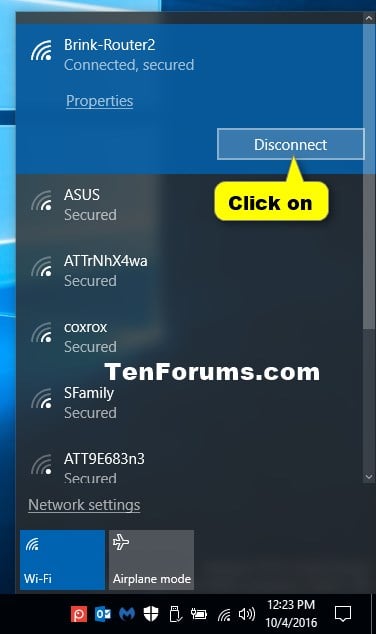
To Turn Off Connect Automatically to Wireless Network by Disconnecting
1. Disconnect from the wireless network. You will need to manually connect to this wireless network when you want to connect to it again. (see screenshot below)
Option 3
To Turn On or Off Connect Automatically to Wireless Network in Settings
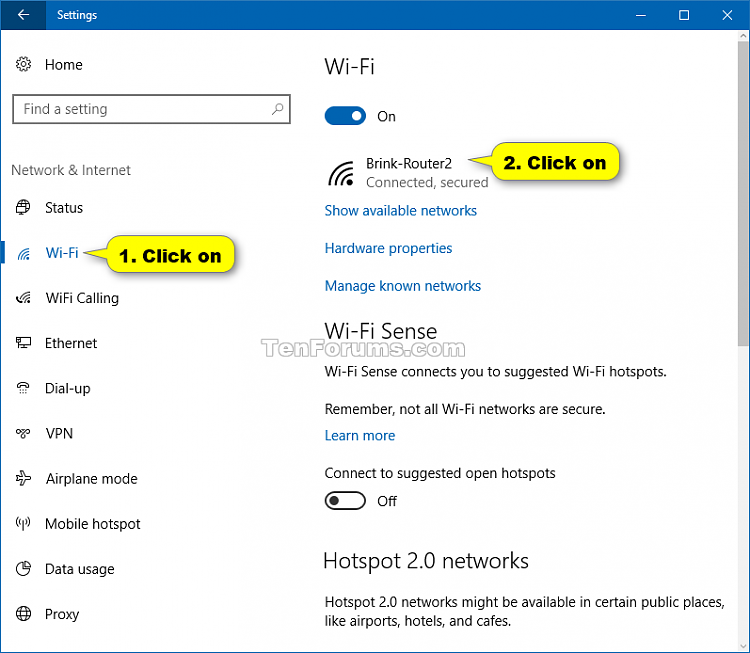
1. Open Settings, and click/tap on the Network & Internet icon.
2. Click/tap on Wi-Fi on the left side, and click/tap on the connected wireless network (ex: "Brink-Router2") on the right side. (see screenshot below)
3. Turn on or off Connect automatically when in range for what you want for this wireless network. (see screenshot below)
4. You can now close Settings if you like.
Option 4
To Turn On or Off Connect Automatically to Wireless Network in Network Connections
1. Press the Win+R keys to open Run, type ncpa.cpl into Run, and click/tap on OK to open Network Connections.
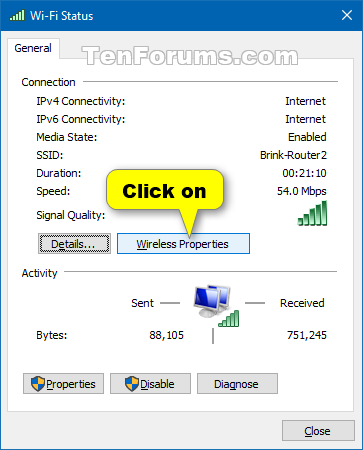
2. Click/tap on the wireless network (ex: "Brink-Router2"). (see screenshot below)
3. Click/tap on the Wireless Properties button. (see screenshot below)
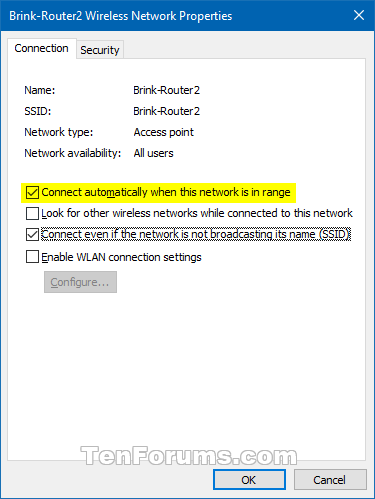
4. Check (on) or uncheck (off) Connect automatically when this network is in range for what you want, and click/tap on OK. (see screenshot below)
5. Click/tap on Close. (see screenshot below step 3)
6. You can now close Network Connections if you like. (see screenshot below step 2)
Option 5
To Turn On or Off Connect Automatically to Wireless Network in Command Prompt
1. Open a command prompt.
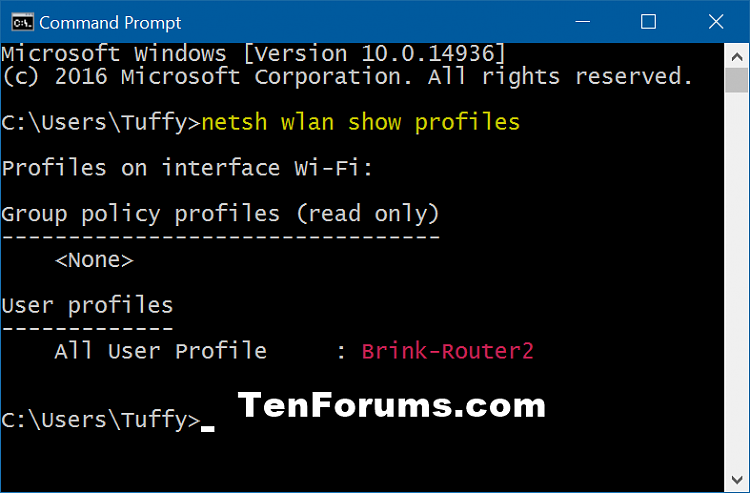
2. Enter the command below into the command prompt, press Enter, and make note of the wireless profile name (ex: "Brink-Router2") that you want to turn on or off connect automatically. (see screenshot below)
3. Enter the command below into the command prompt, press Enter, and see if the Connection mode of this wireless network is currently set to Connect automatically or Connect manually. (see screenshot below)
 netsh wlan show profile "name"
Substitute name in the command above with the actual name of the wireless network profile from step 2).
For example: netsh wlan show profile "Brink-Router2"
For example: netsh wlan show profile "Brink-Router2"

4. Enter the command you want to use below into the command prompt, and press Enter. (see screenshots below)
(To turn on connect automatically to wireless network)
 netsh wlan set profileparameter name="name" connectionmode=auto
(To turn off connect automatically to wireless network)
 netsh wlan set profileparameter name="name" connectionmode=manual
Substitute name in the commands above with the actual name of the wireless network profile from step 2).
For example:
netsh wlan set profileparameter name="Brink-Router2" connectionmode=auto
netsh wlan set profileparameter name="Brink-Router2" connectionmode=manual
For example:
netsh wlan set profileparameter name="Brink-Router2" connectionmode=auto
netsh wlan set profileparameter name="Brink-Router2" connectionmode=manual


5. You can now close the command prompt if you like.
This page was: Helpful |
Not Helpful
