Home → Office 365 → Apple iPhone → Set up a shared mailbox using the iOS Mail app
6.2. Set up a shared mailbox using the iOS Mail app
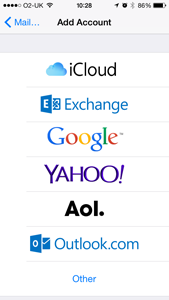
On the iPad or iPhone, go to SETTINGS > MAIL > ACCOUNTS > ADD ACCOUNT
2. Select OTHER from the list of types.

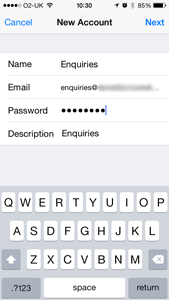
3. Select ADD MAIL ACCOUNT

4. Enter a name for the mail account (eg “Enquiries”)
5. Enter the email address of the shared mailbox
6. Enter the password of a mailbox that has access to the shared mailbox (eg your own password if you have access to the shared mailbox)
7. Enter a description for the mailbox (eg “Enquiries”)
8. Tap NEXT
9. Select IMAP

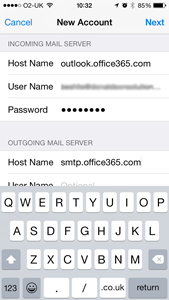
10. Fill in the blank information

i) Host name: outlook.office365.com
ii) In the user name box, enter the email address of the account that has access to the shared mailbox, followed by a “\” and then the email address of the shared mailbox itself. (eg “your.name@yourdomain.com\enquiries@yourdomain.com“)
iii) Outgoing mail server: smtp.office365.com
iv) User name: Enter the email address of the mailbox with the permission to “send as” the shared mailbox.
v) Password: Enter the password of the mailbox with the permission to access the shared mailbox (same as step ‘iv’ above)
vi) Tap NEXT
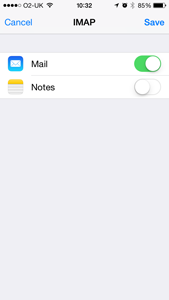
11. Tap SAVE

12. Switch off the NOTES sync which should leave just MAIL switched on.
13. Tap SAVE
14. Exit the MAIL app by ending the task (doublle press the HOME button and slide the Mail app off the top of the screen)
15. Enter the MAIL app and check that the account works
Your Office 365 shared mailbox is now configured on your device. You will find your new email account in the standard Mail app on your iPhone or iPad.