Home → Hardware → Printer Friendly Version
Hardware
1. USB
1.1. USB Type-C and Thunderbolt 3: One port to connect them all
An explanation of USB-C and Thunderbolt 3 and the significance of these peripheral standards.
Look around your house and chances are you have at least a few devices that use Universal Serial Bus. On average, some 3 billion USB ports are shipped each year, making it by far the most successful peripheral connection type in the world.
In fact, device manufacturers are so confident in the new USB-C standard that Intel announced last year that Thunderbolt 3, once thought to be a USB replacement, will use the same port type as USB-C. This means every Thunderbolt 3 port will also work as a USB-C port and every Thunderbolt 3 cable will work as a USB-C cable.
Before you can fully appreciate what a leap forward both USB Type-C and Thunderbolt 3 are, let's familiarize you with Type-A, Type-B, and the various versions of the Thunderbolt standard.
Thunderbolt
Prior to Thunderbolt 3, Thunderbolt 2 and the original Thunderbolt shared the same cable type and port (which is the same port type as Apple's Mini DisplayPort) and had top data transfer speeds of 20Gbps and 10Gbps, respectively. With these older Thunderbolt standards, the cable was active, meaning the cable itself is a device that requires power to operate (which is why most Thunderbolt 1 or 2 devices would require an external power source in order to function.) This made Thunderbolt a much more expensive solution, as the cable itself is some 10 times more expensive than a USB cable of the same length.
Thunderbolt revisions
| Revision | Year released | Super set of | Top speed | Port type |
|---|---|---|---|---|
| Thunderbolt | 2011 | Mini DisplayPort | 10Gbps | Mini DisplayPort |
| Thunderbolt 2 | 2013 | Thunderbolt | 20Gbps | Mini DisplayPort |
| Thunderbolt 3 | 2015 | Thunderbolt 2 (adapter required,) DisplayPort, PCIe 3rd Gen, USB 3.1 | 40Gbps (short or active cable) 20Gbps (long, passive cable,) | USB-C |
Here's how Thunderbolt 3 is different from its predecessors:
- The Mini DisplayPort connection type has been ditched in favor of a USB-C connection type.
- All Thunderbolt 3 cables will work as USB-C cables.
- All USB-C cables will work as Thunderbolt 3 cables as long as they are good quality cables.
- Thunderbolt 3 has a top data transfer speed of 40Gbps as long as the cable is 0.5m (1.6 ft.) or shorter.
- For 1m (3.2 ft.) or longer cables, Thunderbolt 3 supports passive (cheaper) ones that have a top speed of 20Gbps, and active cables (more expensive) that retain the 40Gbps speed.
- Thunderbolt 3 is backward-compatible with earlier versions of Thunderbolt, but due to the new port type, adapters are required to use legacy Thunderbolt devices.
- Any USB-C device (like a Google Pixel) plugged into a Thunderbolt 3 port will function normally.
- Since Thunderbolt 3 devices use discrete Thunderbolt chips to function, they will not function if plugged into a USB-C port.
All versions of Thunderbolt allow for daisy-chaining up to six devices together to a host and in addition to data, can also carry Hi-Def video and audio signals.
USB
In the USB world, things are a bit more complicated because there have been more versions and types than Thunderbolt. Generally, the versions refer to the speed and functionality of the USB cable, while the USB type refers to the physical shape and the wiring of the ports and plugs. Let's start with the USB type.

USB Type-A
Also known as USB Standard-A, USB Type-A is the original design for the USB standard and uses a flat rectangular shape.
On a typical USB cable, the Type A connector, aka the A-male connector, is the end that goes into a host, such as a computer. And on a host, the USB port (or receptacle) where the Type A-male is inserted, is called an A-female port. Type-A ports are mostly in host devices, including desktop computers, laptops, game consoles, media players and so on. There are very few peripheral devices that use a Type-A port.
Different USB versions including USB 1.1, USB 2.0 and USB 3.0 (more on differing versions below) currently share the same USB Type-A design. That means a Type-A connector is always compatible with a Type-A port event if the device and host use different USB versions. For example, a USB 3.0 external hard drive also works with a USB 2.0 port, and vice versa.

Similarly, small devices such as a mouse, keyboard or network adapter that have hard-wired USB cables always use Type-A connectors. That's true also for gadgets without cables, such as a thumb drive.
USB 3.0's connectors and ports have have more pins than USB 2.0. This is in order to deliver faster speeds and higher power output. However, these pins are organized in a way that doesn't prevent them from physically working with the older version.
Also note that there are smaller Type-A plugs and connectors, including Mini Type-A and Micro Type-A, but there are very few devices that use these designs.

USB Type-B
Typically, the Type-B connector is the other end of a standard USB cable that plugs into peripheral device (such as a printer, a phone or an external hard drive). It's also known as Type B-male. On the peripheral device, the USB port is called Type B-female.
Since the peripheral devices vary a great deal in shape and size, the Type-B connector and its respective port also come in many different designs. Up to now there have been five popular designs for the USB Type-B's plugs and connectors. And since the Type-A end of a USB cable remains the same, the Type-B end is used to determine the name of the cable itself. (Wikipedia has a great USB connector mating matrix you can consult.)
The original standard (Standard-B): This design was first made for USB 1.1 and is also used in USB 2.0. It's mostly for connecting large peripheral devices, such as printers or scanners to a computer.
Mini-USB (or Mini-B USB): Significantly smaller, the Mini-USB Type-B ports are found in older portable devices, such as digital cameras, phones and older portable drives. This design is now close to obsolete.
Micro-USB (or Micro-B USB): Slightly smaller than Mini-USB, the Micro-USB Type-B port is currently being replaced by USB-C as the charging and data port for latest phones and tablets.
Micro-USB 3.0 (or Micro-B USB 3.0): This is the widest design and mostly used for USB 3.0 portable drives. Most of the time, the Type-A end of the cable is blue.
Standard-B USB 3.0: This design is very similar to the Standard-B, however, it's designed to handle USB 3.0 speed. Most of the time, both ends of the cable are blue.
Note that there's also another, less popular, USB 3.0 Powered-B plug and connector. This design has two additional pins to provide extra power to the peripheral device. Also, there's a relatively rare Micro Type-AB port that allows the device to work as either a host or a peripheral device.

Proprietary USB
Not all devices use the standard USB cables mentioned above. Instead, some of them use a proprietary design in the place of the Type-B plug and connector. The most famous examples of these devices are the iPhone and the iPad, where either a 30-pin or Lightning connector takes place of the Type-B end. The Type-A end, however, is still the standard size.
USB revisions
| Top speed | Max power output | Power direction | Cable configuration | Availability | |
| USB 1.1 | 12Mbps | N/A | N/A | Type-A to Type-B | 1998 |
| USB 2.0 | 480Mbps | 5V, 1.8A | Host to peripheral | Type-A to Type-B | 2000 |
| USB 3.0 / USB 3.1 gen 1 | 5Gbps | 5V, 1.8A | Host to peripheral | Type-A to Type-B | 2008 |
| USB 3.1 / USB 3.1 gen 2 | 10Gbps | 20V, 5A | Bi-directional / Host to peripheral (compatible) | Type-C both ends, reversible plug orientation / Type-A to Type-C (compatible) | 2013 |
USB versions
USB 1.1: Released in August 1998, this is the first USB version to be widely adopted (the original version 1.0 never made it into consumer products). It has a top speed of 12Mbps (though in many cases only performs at 1.2Mbps). It's largely obsolete.
USB 2.0: Released in April 2000, it has a max speed of 480Mbps in Hi-Speed mode, or 12Mbps in Full-Speed mode. It currently has the max power out put of 5V, 1.8A and is backward-compatible with USB 1.1.
USB 3.0: Released in November 2008, USB 3.0 has a top speed of 5Gbps in SuperSpeed mode. A USB 3.0 port -- and its connector -- are usually colored blue. USB 3.0 is backward-compatible with USB 2.0 and its port can deliver up to 5V, 1.8A of power. This is sometimes refereed to as USB 3.1 Gen 1.
USB 3.1 (sometimes refereed to as USB 3.1 Gen 2.): Released on July 26, 2013, USB 3.1 doubles the speed of USB 3.0 to 10Gbps (now called SuperSpeed+ or SuperSpeed USB 10 Gbps), making it as fast as the original Thunderbolt standard. USB 3.1 is backward-compatible with USB 3.0 and USB 2.0. USB 3.1 has three power profiles (according to USB Power Delivery Specification), and allows larger devices to draw power from a host: up to 2A at 5V (for a power consumption of up to 10W), and optionally up to 5A at either 12V (60W) or 20V (100W). The first USB 3.1 products are expected to be available in late 2016, and will mostly use USB Type-C design.

USB Type-C (or USB-C)
Physically, the Type-C port and connector are about the same size as those of the Micro-B USB mentioned above. A Type-C port measures just 8.4 by 2.6mm. This means it's small enough to work for even the smallest peripheral devices. With Type-C, both ends of a USB cable are the same, allowing for reversible plug orientation. You also don't need to worry about plugging it in upside down as it will function both ways.
Since 2015, USB-C has been widely adapted and used in many phones and tablets. Many new storage devices also use USB-C ports instead of a USB-B port. Almost all devices that support USB 3.1 use the USB-C port. USB 3.1 has a top speed of 10Gbps and can deliver a power output of up to 20 volts (100 watts) and 5 amps. When you consider most 15-inch laptops require just around 60 watts of power, this means in the future they will be charged the way phones are now, via their little USB port. Apple's new MacBook has just one USB-C port as the sole peripheral and power port.
Type-C USB also allows for bi-directional power, so apart from charging the peripheral device, when applicable, a peripheral device could also charge a host device. All this means you can do away with an array of proprietary power adapters and USB cables, and move to a single robust and tiny solution that works for all devices. Type-C USB will significantly cut down the a amount of wires currently needed to make devices work.

One port, one cable, no fuss
Type-C USB and USB 3.1 are backward-compatible with USB 3.0 and USB 2.0. In a pure Type-C USB connection, the Type-A ports and plugs are no longer included. However, you'll find compatible Type A-to-Type C cables. On top of that, there will be adapters to make Type C hosts and devices work with existing USB devices.
This is the first time adapters are required with USB connections, and likely the only time, at least for the the foreseeable future. USB Implementers Forum, the group responsible for the development of USB, says that Type-C USB is designed to be future-proof, meaning the design will be used for future and faster USB versions.
It will take a few years more for Type-C become to become as popular as the current Type-A on the host side, but when it does it will simplify the way we work with devices. In fact, Intel is even working on a USB audio standard that might render the 3.5mm audio jack obsolete. And with the addition of Thunderbolt 3 now being the super-set of USB-C, eventually, we'll just have only one type of port and cable to connect all peripheral devices to each other and to a computer. It's predicted that, thanks to support for USB-C, the adoption of Thunderbolt 3 will take off, which hasn't been the case with previous versions of Thunderbolt.
2. Apple
2.1. Shutdown Codes
Starting with the advent of Intel boards, all shutdowns are tagged with an 8-bit code, if the normal software shutdown flags are not recorded. A positive code indicates a software or HID initiated shutdown, while a negative code (in the range of -1 to -127) indicates hardware-related Intel SMC-initiated shutdown.
A -128 shutdown code indicates a hardware-related shutdown of unknown cause.
The 0 shutdown code resides in a liminal space between the hardware and the user; it signifies a sudden loss of power which can either be caused by a hardware failure or user action (if you want to demonstrate this for yourself, try popping the battery out of an old MacBook or MacBook Pro while it's on and unplugged, or pulling the power cord out of an iMac while it's running, then rebooting the computer and checking Console.app. A 0 Sleep Cause results when a MacBook/Pro/Air puts itself into SafeSleep using the last bit of reserve battery power before full system shutdown in order to preserve the contents of RAM in the
/var/vm/sleepimage
file. Unless you happen to connect your MagSafe adapter immediately after the computer goes to sleep, this code is pretty well guaranteed to be followed a 0 Shutdown Cause in the system.log.
Some of the hardware shutdown codes are unique to specific models of computer depending on their configuration because they refer to a specific sensor or device that exists only in that model when I worked for Apple we were told that Intel was responsible for assigning the codes and wasn't particularly free with the information sharing on that count, even with Apple Engineering. So we pretty much had to figure out the obscure ones on our own.
Code 5 is a clean, user initiated software shutdown, e.g. by selecting Shut Down from the menu, or pressing the power button and selecting Shut Down in the pop-up window, or holding down controloptioncommandeject, or typing
sudo halt
at the command prompt. Similarly, a Previous Sleep Cause of 5 indicates any clean user-initiated sleep, from the menu or a hot corner or the command line or closing the lid and triggering the hall-effect sensor in the top case of a MacBook/Pro/Air.
Code 3 is a "dirty" Shutdown, which can be caused by any user-initiated Reboot of the computer, or by forcing a hardware computer halt by holding down the power button for 5+ seconds.
3. Hewlett Packard
3.1. HP Caps Lock Blink Codes 2022
Below we will explain what these codes mean to make it an ultimate guide for the HP Support Blink Codes:
| Number of Blinks or Beeps | Location of Blinking LEDs | Component Being Checked | Error Condition |
|---|---|---|---|
| Continuous glow | Battery power LED | Battery | Battery is charging but yet not sufficiently charged to power the device |
| 1 | Caps Lock/Num Lock | CPU | CPU not functional |
| 2 | Caps Lock/Num Lock | BIOS | BIOS corruption failure |
| 3 | Caps Lock/Num Lock | Memory | Module error not functional |
| 4 | Caps Lock/Num Lock | Graphics | Graphics controller not functional |
| 5 | Caps Lock/Num Lock | System board | General system board failure |
| 6 | Caps Lock/Num Lock | BIOS | BIOS authentication failure |
| Continuous blink | AC power adapter LED | Power adapter | Insufficient power |
3 Long 2 Short
if you notice the caps lock blinks 3 long and 2 short times, it indicates timing out of the fixed controller while waiting for the BIOS to be back from system board initialization. The same reason attributes to the HP caps Lock Blinking 5 Times. To put it simply, it means system board failure on the system. You can try to turn the BIOS to default to check if this can help fix the problem.
5 Long 3 Short

when the caps lock blinks like this, this indicates a problem with the motherboard. Usually, it is not easy to get it fixed locally as the parts needed for repair are not available in open markets, it is quite likely that you need to send to the HP support to get the motherboard fixed or, if need be, replaced.
Blink 3 Times
this indicates a problem with the memory module. It’s rare that both the memory modules are faulty, so to rule out which one is causing trouble you should remove one memory module at a time and see if that works. If this doesn’t work try interchanging both memory modules in each other’s slot. The problem is usually solved by doing this.
Blinking Continuously
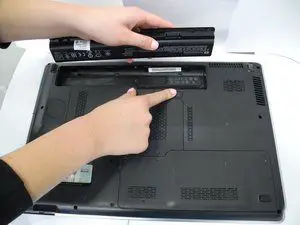
there can be a number of reasons for this which include a problem with the power supply, a faulty battery, a blocked ventilation system, failure to detect CPU, or a faulty charger. To fix this perform a complete shutdown of your system and disconnect the power supply. Remove the battery and remove RAM from the RAM slot also disconnect the wireless card. Now press and hold the power button for about 30 seconds. Finally, connect back everything and now try to reboot the system.
Check out Best Vinyl Cutters in UK
3 Slow 5 fast
the blinking of this sort indicates a problem with the processor of your system. Now, this is a problem that is not possible to troubleshoot by yourself. You need to contact HP support and seek their help in this regard and see what kind of support can be provided for this.
HP OMEN Caps Lock Blink Codes
If the screen is blank and the caps lock is blinking, many steps can be taken to determine the cause and trying to fix it. one reason can be that the battery is not accepting the charger, contact HP support to replace the battery. If that is not the issue check if the BIOS is updated, if it is, then press F5 to turn it back on. If all of this can’t help, then confirm if the OMEN is up to date using the HP support document.
HP G 62 Caps Lock Blink Codes
First of all, make sure if any hardware replacement or addition is done recently to your laptop. Secondly, remove the hard disk of your system and make sure it is not damaged. Now try the following steps to try and fix the issue
- Turn off your computer and take out the battery
- Disconnect the charger from your system
- Remove battery modules one at a time and try inserting in a different slot
- If the issue remains a BIOS recovery is recommended.
HP DV 6 Caps Lock Blink Codes
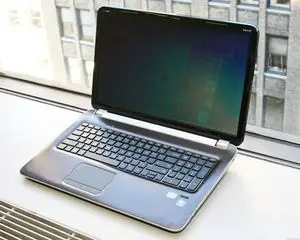
This model is from the HP Pavillion series and the laptops of this series have an impending issue of graphic cards. The heatsink pad in the graphic chipset is not very efficient, the GPU can burn out because of this and most probably you will have to buy a new one.
HP DV 7 Caps Lock Blink Codes
Mostly the processor or one of the hardware needs to be checked to see if this can solve the issue. A common tip that can be useful is to disconnect the charger from the laptop and take out the battery. Now reconnect the charger and turn on your system without the battery in it. Now boot the system till you’ve reached Windows desktop and allow the HDD activity to settle down. Finally, restart the system after reinserting the battery in it and check if the problem is solved.
https://topvinylcutters.com/hp-caps-lock-blink-codes/
3.2. HP PC Hardware Diagnostic Tools
How do I use HP PC Hardware Diagnostic Tools?
Our diagnostic tools are used to determine if your computer’s hardware is functioning properly. HP PC Hardware Diagnostics Windows come pre-installed on new HP computers, if not on your computer, you can download it using the download button below:
HP PC Hardware Diagnostics Windows v2.4.0.0
The HP PC Hardware Diagnostics Windows tool offers driver checks and updates on select components while also providing the ability to test the hardware components of your computer, quickly diagnoses hardware failures, streamlines support calls to HP, and can help avoid returns of working hardware. Supports Windows 10 and 11 Operating Systems.
The download can also be found from HP's website here:
https://support.hp.com/gb-en/help/hp-pc-hardware-diagnostics
3.3. HP Image Assistant
The HP Image Assistant is an essential tool that provides assistance to IT System Administrators to improve the quality and security of their HP PCs running Microsoft Windows by analyzing, identifying problems, and recommending solutions.
Works with Windows 10 and 11 Pro, not Home.
Page link here: http://ftp.ext.hp.com//pub/caps-softpaq/cmit/HPIA.html
3.4. Calibrate the Battery on HP Notebooks
This video shows how to calibrate the battery on your HP Notebook. We will use the HP PC Hardware Diagnostics UEFI to calibrate the battery and restore the proper levels. For other helpful videos go to ![]() / hpsupport . More support options for your HP device are available at https://hp.com/support. For step-by-step guidance, connect with our Virtual Agent: https://virtualagent.hpcloud.hp.com/?...
/ hpsupport . More support options for your HP device are available at https://hp.com/support. For step-by-step guidance, connect with our Virtual Agent: https://virtualagent.hpcloud.hp.com/?...
4. Ubiquiti Networks
4.1. UniFi - How can I restore a backup configuration?
There are two ways to restore the backup. The preferred method is with the .unf file generated by backup settings. Alternatively if you have a copy of the /data directory that will allow recovery too.
If you have the .unf (backup) file you can either restore from an active controller (Settings>Admin>Restore) or from the first page of the setup wizard (Browse near the bottom).
--
If you have the original /data folder (all subfolders and contents inclusive), you can
- stop the controller
- make sure java and mongod are not running (on Windows mongod is rather persistent, so it's best to perform the following steps in Safe Mode)
- copy the new keystore (found in new /data directory) file to the old backup /data directory, overwriting the old one
- delete the new data directory
- copy the old /data directory to the new UniFi installation
- restart the controller
--Data folder locations
MSW:
Vista+: C:\Users\username\Ubiquiti UniFi\data
XP: C:\Documents and Settings\username\Ubiquiti UniFi\data
Linux:
Actual directory: /var/lib/unifi/
Symlinked directory: /usr/lib/unifi/data
Mac: /Applications/UniFi.app/Contents/Resources/data
--
If the .unf file is really large it may give you an error saying Failed to Start on import or migration. If you have time you can let this sit for a while, and then try accessing the controller. It may import fine. If it doesn't you may need to revert to the original version of the controller, run the pruning script, make a new backup, then either purge and install then restore, or do an in-place upgrade.
We are reviewing database management to alleviate or eliminate this issue. This article will be updated later to reflect that.
5. DrayTek
5.1. TFTP Recovery Procedure
With a successful firmware upgrade you should be able to regain access to the unit.
First of all, could you please check to see if the router will go into TFTP mode?
If the router successfully enters TFTP mode then this would indicate that the issue is probably just a firmware corruption that would be resolved by a successful firmware upgrade. After a successful upgrade the router should return to normal operation.
To check the router, please turn it on while also holding the Factory Reset button down. If the router has correctly entered TFTP mode the first three lights start flashing simultaneously. Let go of the Factory Reset button once it is in that state and the router will remain in TFTP mode for 90 seconds.
While the router is in TFTP mode it will accept the firmware via the firmware upgrade utility. The firmware upgrade utility will be able to send the firmware to 192.168.1.1 if the PC is on a 192.168.1.X IP address range. Sometimes it is easier to fix the PCs IP to 192.168.1.2 and it is recommended to turn off anti-virus / software firewall application because they can interfere with the process.
In the firmware upgrade utility manually enter the router IP Address as 192.168.1.1 instead of using the search function.
The firmware can be downloaded from:
http://www.draytek.co.uk/support/downloads
The utility from:
http://www.draytek.co.uk/download/support/FirmwareUpgrade_365_Win.zip
There are two firmware files. One ending in .rst and one ending in .all. Try the .all one first, but if that doesn't work then use the .rst firmware to upgrade the firmware and clear the router settings at the same time.
Further details on how to successfully restore the router's firmware are on http://www.draytek.co.uk/support/guides/kb-firmwarerecovery
6. MacBook Pro
6.1. Portables and Magic Trackpad: Jumpy or erratic trackpad operation
Symptoms
Learn what to do if the cursor jumps or moves without the trackpad being touched. The cursor may also act strangely when the trackpad is touched.
Resolution
The Apple Magic Trackpad and built-in trackpads on Apple portable computers work on a principle called coupling capacitance. As your finger moves over the surface, the trackpad evaluates the change in capacitance between two layers of measurement electrodes built into the surface of the trackpad and translates that to cursor movement.
Verify only one part of your finger is touching the pad. You cannot use a pen or other object--the trackpad is designed to work only with your finger. Also confirm that you are not resting your wrist on or very close to the pad. The trackpad may interpret this as your wrist touching it and make the cursor move in that direction. If you suspect either of these is causing the cursor's behavior, try raising your wrist in the air and touch the pad with only the tip of your finger. If the symptom goes away then, you know that one of the above is the cause, and you should adjust the position of your wrist or finger.
If you have sweaty hands or if moisture collects on the pad, this may also confuse the trackpad. Wiping off the trackpad with a cloth or tissue usually fixes this issue. If the issue goes away when a piece of paper is put between the finger and trackpad you may want to consider purchasing a Teflon applique to fit over the pad to prevent the moisture from having direct contact with the trackpad. Before installing the Teflon applique, confirm the trackpad is clean and dry. You can use a mild glass cleaner sprayed onto the cloth, not onto the trackpad itself to clean the trackpad.
Oil or lotion can also cause the same issue. Do not use hand lotion, or consider purchasing a Teflon pad to protect the trackpad. Before installing the Teflon pad, confirm the trackpad is clean and dry.
Jewelry may also cause interference. Try removing rings or bracelets and see whether the jumpy or erratic behavior disappears.
Apple has had some reports of this behavior related to power supplies made by a third party company. If you are using one of these power adapters, unplug it and try running from the Apple battery to see how the trackpad behaves. Also try using the Apple AC adapter instead of the third-party AC adapter. If the trackpad behaves normally while running from the Apple battery or adapter, there is most likely an issue with your third-party adapter.
6.2. Apple Portables: Calibrating your computer's battery for best performance
The battery has an internal microprocessor that provides an estimate of the amount of energy in the battery as it charges and discharges. The battery needs to be recalibrated from time to time to keep the onscreen battery time and percent display accurate and to keep the battery operating at maximum efficiency. You should perform this procedure when you first use your computer and then every few months after that. If you normally leave your Apple portable computer connected to AC power and very rarely use it on battery power you may want to perform this process once a month. The website www.apple.com/batteries has more helpful information regarding batteries and offers an iCal calendar to remind you to calibrate your battery.
Note: If you're not sure which model your portable computer is, use these links to identify your iBook, PowerBook,MacBook, MacBook Air, or MacBook Pro.
Portables with built-in batteries
Current Apple portable computer batteries are pre-calibrated and do not require the calibration procedure outlined in this article. These computers use batteries that should be replaced only by an Apple Authorized Service Provider.
MacBook
- MacBook (13-inch, Late 2009) and later
MacBook Air
- MacBook Air (all models)
MacBook Pro
- MacBook Pro with Retina display (all models)
- MacBook Pro (13-inch, Mid 2009) and later
- MacBook Pro (15-inch, Mid 2009) and later
- MacBook Pro (17-inch, Early 2009) and later
Portables with removable batteries
iBooks and PowerBook G4s other than the PowerBook G4 (15-inch Double-Layer SD)
- Plug the power adapter in and fully charge your computer's battery until the battery indicator lights turn off and the adapter plug light goes from amber to green, which indicates that the battery is fully charged.
- Disconnect the power adapter and use your iBook or PowerBook. When your battery gets low, you will see the low battery warning dialog on the screen. Continue to use your computer until it goes to sleep. At that point the battery has been sufficiently drained for calibration.
- Connect the power adapter and leave it connected until the battery is fully charged again.
You have to fully charge and then discharge your battery only once to calibrate it. After that, you can connect and disconnect the power adapter when the battery is at any charge level.
Tip: When the battery reaches "empty", the computer is forced into sleep mode. The battery actually holds a reserve beyond "empty", to maintain the computer in sleep for a period of time. Once the battery is truly exhausted, the computer is forced to shut down. At this point, any open files could be lost. Therefore, it is important that you find an electrical outlet and connect the adapter before the forced shutdown occurs.
PowerBook G4 (15-inch Double-Layer SD), MacBook (all models), and MacBook Pro (all models)
The battery calibration for the PowerBook G4 (15-inch Double-Layer SD) and any model of MacBook or MacBook Pro has been updated because of a new battery released with this computer. With these computers, follow these steps to calibrate your battery:
- Plug in the power adapter and fully charge your PowerBook's battery until the light ring or LED on the power adapter plug changes to green and the onscreen meter in the menu bar indicates that the battery is fully charged.
- Allow the battery to rest in the fully charged state for at least two hours. You may use your computer during this time as long as the adapter is plugged in.
- Disconnect the power adapter while the computer still on and start running the computer off battery power. You may use your computer during this time. When your battery gets low, the low battery warning dialog appears on the screen.
- At this point, save your work. Continue to use your computer; when the battery gets very low, the computer will automatically go to sleep.
- Turn off the computer or allow it to sleep for five hours or more.
- Connect the power adapter and leave it connected until the battery is fully charged again.
Tip: When the battery reaches "empty", the computer is forced into sleep mode. The battery actually keeps back a reserve beyond "empty", to maintain the computer in sleep for a period of time. Once the battery is truly exhausted, the computer is forced to shut down. At this point, with the safe sleep function introduced in the PowerBook G4 (15-inch Double-Layer SD) computers, the computer's memory contents have been saved to the hard drive. When power is restored, the computer returns itself to its pre-sleep state using the safe sleep image on the hard drive.
6.3. Ouch! My MacBook just shocked me!
Should your Mac give you a mild shock, don't worry; that just means everything is working OK.
So you've purchased your new Mac and you've set it up in your home or office, but when you touched it--it might have been the chassis or the keyboard--you got a small shock. Don't worry; you aren't tempting fate or a trip to the hospital.
While annoying, the problem here is simply a matter of static electricity, which in the amounts most people encounter is not dangerous and does not indicate a fault in the system. In this case, your body has acted like a small capacitor (similar to that in a camera flash), and over time has built a charge. When you touch the computer's case that is grounded, or if you touch a device connected to it such as a keyboard, then like setting off the camera flash you get a discharge and a small zap.
Static electricity can build up on your body for lots of reasons, including the clothes you are wearing, what items you have rubbed against or been in contact with, and atmospheric conditions such as the humidity level. Apple's computers, being made of aluminum, are highly conductive, but the same thing will happen if you touch another object that can serve as a ground or electronic "sink," including metal filing cabinets or even door jambs and handles.
Will it hurt my system?
Static discharges do have the potential to harm electronics, which is why many electronic components (motherboards, hard drives, and PCI cards) are shipped in antistatic bags; however, with an assembled system the vast majority of static discharges are grounded to the system's chassis, so provided you do not touch the inside of your system and only touch the chassis, the charges will get dissipated to earth ground instead of being routed through the system's components. This is what grounding circuits are for, and despite the annoyance of a shock, it means they are working properly.
Will it hurt me?
When you get shocked by a small static discharge, the electrical activity you feel is on the surface of your skin at the point of contact, and despite being uncomfortable will very likely not cause you any harm. If the charge were very large, you would feel more than just pain at the source of contact, and would feel its effect farther away in muscles and nerves that could result in a non-reflexive twitch or spasm (think about the effects of a taser where your whole body seizes up).
If you are concerned about the computer somehow channelling wall power to your body, then be assured this is also not happening, because the wall outlet power is high-power alternating current (AC), whereas static charge buildups are low-power and are direct current (DC) in nature. Once the static charge dissipates to ground, the charge is neutralized and the electrical activity stops.
Should the wall's AC circuit be routed through the computer, you would get not only a very large shock because of the massive 15-20 amps in most wall outlets, but the shock would be different in nature than the zap of a static discharge. In AC circuits the current first moves in one direction and then in the opposite direction at a rate of about 60 times per second. This activity acts like a pump that allows transformers to propagate current over great distances instead of needing many power stations, which is why it's used.
If this AC energy were routed into your body, then you would feel an intense vibration at a frequency of around 60Hz that would surge through your body, disrupting muscles and nerves, and burning you (or worse) before the circuit breaker trips. If you have ever heard a wall socket short out, that loud, buzzing sound before the circuit breaker trips is indicative of the alternating current in the circuit.
If the computer were shorting out an AC circuit in this manner, its delicate DC components would very likely get overloaded and break, and any shock felt would be much different than a static discharge zap. Furthermore, computer power supplies will prevent wall power from surging to the rest of the system. In laptop and Mac Mini systems the power supply that converts wall AC circuits to the DC circuit the computer uses are generally separate from the system, so any faults in it would likely result in it breaking without affecting the system. In iMac and other desktop systems this power supply is in the chassis; however, if it shorts out and breaks, then the wall circuit would still be broken instead of charging the entire chassis with wall current.
Is there any way to stop it?
When it comes to managing static discharges, there is really no way to prevent them from happening; however, you can control their prevalence a bit. Humidity helps reduce static charge build-ups, so one option is to get a humidifier for your house might help. Another option is to get an ionizer to help the atmosphere in the workplace be more conductive and pull charges away from contact surfaces, including yourself.
You can also regularly ground yourself by touching large metal objects (file cabinets, fridges, or stoves), though you will likely feel a similar shock when you touch these items; however, if you are still concerned about the shocks potentially harming your system, touching another object to send the shock in that direction will dissipate it before you touch your system.
7. Android
7.1. How to Clear App Cache and Data
You open an app, it immediately force closes. You open it again, it does the same thing. There's clearly a problem here---but simply clearing your app data and cache might prove to be a pretty easy fix.
There are two basic types of files that can be cleared from within apps: cache and data. Cache files are just temporarily stored files that the app has downloaded. For example, when you stream music, the app may pre-download the songs as it plays to avoid any disruption. These files are then saved as cache files. After clearing the cache, the app will simply need to re-download any files that it had saved for temporary use. Otherwise, there's no big downside.
Data, on the other hand, is crucial information stored by the application. This contains login information, app preferences, and the like. When you clear app data, it's similar to uninstalling and re-installing the application. It clears out everything the apps has stored, basically forcing it to a fresh state. This is sort of the "worst case" solution---if clearing the cache doesn't help, then clearing the data should.
How to Clear App Cache and Data
If you're having an issue with an app, you should start by clearing its cache. This may not be cause of your problem, but it's an easy and harmless first step to try.
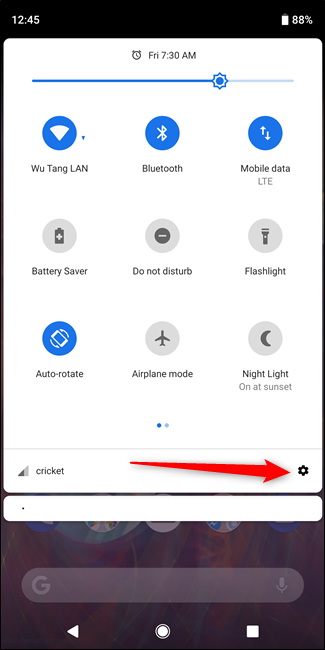
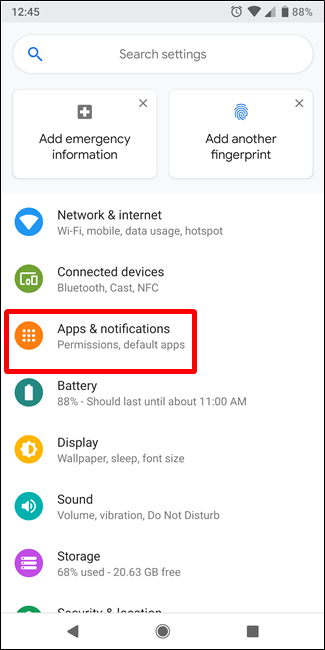
To do this, first open the Settings menu, and then navigation to the "Apps & Notifications" section.
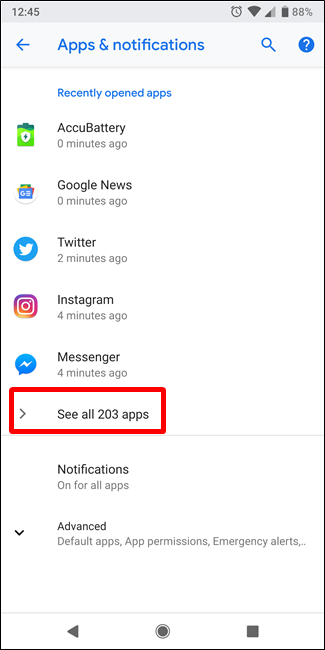
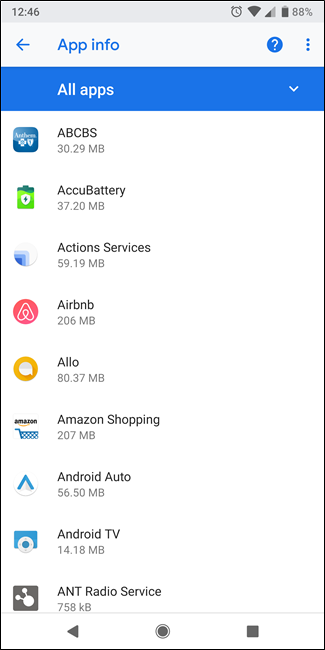
If you're phone is running Android Oreo or newer, you'll need to tap the "See All Apps" button to view the full list. Otherwise, just find the app that's giving you issues on the list.
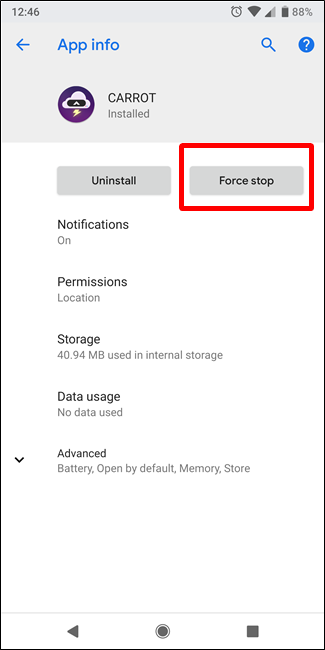
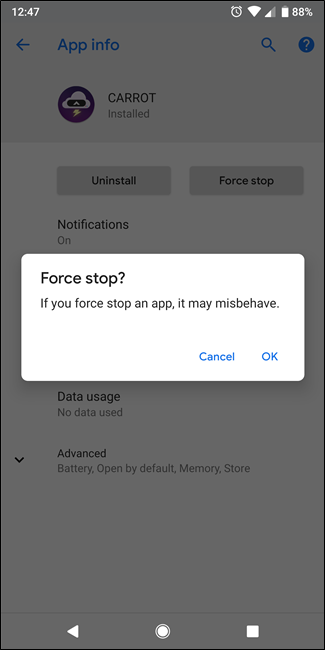
Once you've found the app, the first thing you'll need to do is kill all running instances of it. Tap the "Force Stop" button, and then confirm that action in the popup.
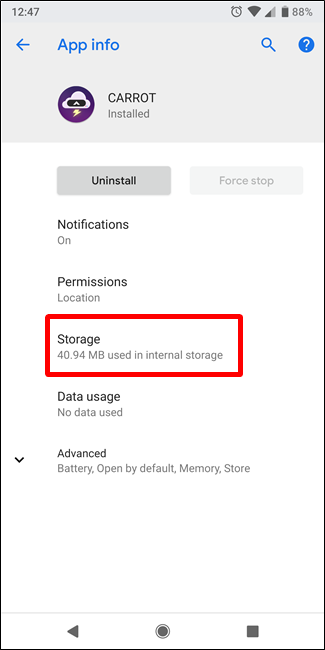
When the app is closed, tap the "Storage" entry.
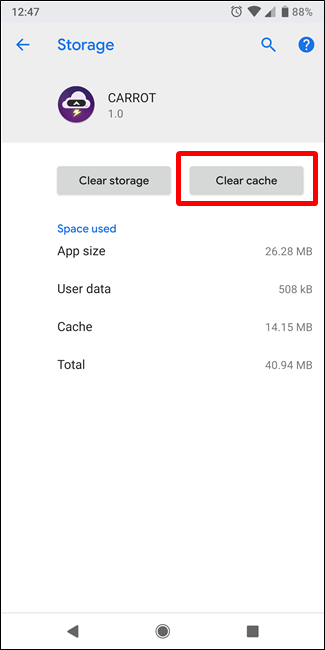
On the Storage menu, tap the "Clear Cache" button.
Try running the app again. If the problem persists, you can repeat the above steps, but tap the "Clear Storage" (or "Clear Data") button instead. Just be aware that you'll lose your data associated with that app.
The next time you launch the app, you'll need to set it up as if it were just installed, but this will hopefully fix any problems you were having with it.
If neither of these steps fix the problem, then the problem may not be on your end. It might be a faulty update pushed by the app developer, and at that point, the best thing you can do is submit a bug report to the developer and hope it gets fixed.
